The light microscope is a very useful tool in the field of science. That kind of tool that, even though it seems easy, lets us see a whole new world. Using visible light to magnify small objects, this microscope lets us peer into realms far beyond what our eyes can naturally see. We would not know anything about the inside workings of cells, organs, and all the other tiny living things that make up life itself without it.
So how does it work? Light microscopes have an eyepiece and several objective lenses that focus light on or off of a sample. When light goes through the material, these lenses work together to make a bigger picture of the thing being studied. That’s pretty smart, right? The lenses change the shape of the light so that you can see things like bacteria or the very small parts inside cells up close.
But don’t fall for it! Even though they can be used for many things, light lenses have their limits. At higher magnifications, features become less clear because the resolution is tied to the light wavelength. This means that they can’t be used to look at viruses or atoms up close. Still, they can make things up to 1000 times bigger, which is plenty to look at a lot of different living samples.
They’re very attractive because they’re not too expensive and are simple to use. You can find these microscopes everywhere, from a high school biology class to a state-of-the-art study center. Being able to look through a glass and see a whole new world is a thrilling experience that everyone has had. There are bacteria moving around, cells dividing, and sometimes an amoeba doing its thing. It’s like going into a whole new world!
But, of course, like most telescopes, there’s a catch. It’s not enough to just put a sample under the lens and expect great results. Preparation is very important. You need thin slices, the right stain, and a steady hand to place the slide. You know what I mean if you’ve ever had a hard time changing your focus for a long time!
The light microscope is indeed a useful tool. Even though it’s not as powerful as an electron microscope, it’s good enough for everyday studies of live things. The light microscope is an important and reliable tool for scientists of all levels, from college students getting ready for a practice to biology teachers showing students the wonders of the subject.
And in the big picture, it shows that science doesn’t have to be high-tech all the time to be great. A little light and a good set of lenses are sometimes all you need.
What is a light microscope?
A light microscope is an optical microscope, utilizing visible light that magnifies very tiny objects. This equipment works by allowing the passage of light through or reflection off a particular object, and lenses collect this light to create a magnified view. Light microscopes are very commonly used in labs for the general examination of cells, tissues, and other microscopic features.
- Basically, it relies on visible light, so one sees the sample without depending on sophisticated technology.
- Light microscopes are equipped with various lenses; however, the most prevalent among these are the eyepiece and objective lenses, which offer distinct levels of magnification.
- They may not be of the highest magnification but, being versatile, are applied in a wide scope of biological, medical, and scientific research.
- The standard light microscope can magnify objects to about 1000x. It is not enough to see viruses or smaller molecules, but it gets the job done for cells and bacteria.
- It is determined by the wavelength of light; hence, finer details are difficult to discern at high magnifications. Nevertheless, it remains very effective in viewing the general structure of organisms, tissues, and cells.
Principle of a light microscope (optical microscope)
The principle of a light microscope, also known as an optical microscope, is essentially founded on the behavior of light while it travels through different media. An important concept here is refraction, which is the bending of light when it passes from one substance to another and therefore changes direction. This bending depends on the refractive index of the materials, which in turn quantifies how much a material resists the propagation of light.
When light travels from one medium to another, its velocity changes, which results in bending. For example, when light is traveling from glass to air, it speeds up and bends away from the normal. On the other hand, when light is traveling from air into glass, it slows down and bends toward the normal. The principle of refraction makes lenses in microscopes work as it dictates how light is focused.
A conventional lens in a light microscope is convex, meaning that it is meant to refract light rays towards some point called the focal point. The distance from the focal point to the center of the lens is termed as the focal length. Such lenses have an image magnified more when their focal length is smaller because the light is focused more accurately. This is the reason why in microscopes, short focal length lenses are commonly used for increasing magnification.
The power of the lens decides the magnification of the light microscope. But it is inversely proportional to the focal length. Therefore, magnification alone cannot decide the ability to resolve small details. Now, let us discuss the term resolution-the ability of a microscope to distinguish between two closely spaced objects. This is a resolution that depends on the numerical aperture of the lens as well as the wavelength of light used.
The numerical aperture is a measure of how much light a lens can capture. This is determined by both the lens design and the refractive index of the medium in which the lens and specimen reside. Meanwhile, the wavelength of light determines the resolving power of the microscope. The lower the wavelength, the higher is the resolution. The relationship between the wavelength and the numerical aperture is quantitatively expressed by the Abbe equation, which allows one to calculate the minimum distance (d) at which two points can still be perceived as separate entities. The equation is:
d=0.5λ/nsinθ
In this case, λ is referred to as the wavelength of light, n stands for the refractive index and θ represents the angular aperture of the lens system.
The limitation in practice, of course, is that objects can only be resolved down to a certain limit with a light microscope, around 200 nanometres due to the limitation imposed by the wavelength of visible light. Nevertheless, light microscopes are one of the most useful tools for biologists and others, giving them a view of structures and organisms at a cellular level.
Types of light microscopes (optical microscope)
Light microscopes, which are also called optical microscopes, are often used to make things bigger by using light. Every type is used for a different thing and has its own special qualities.
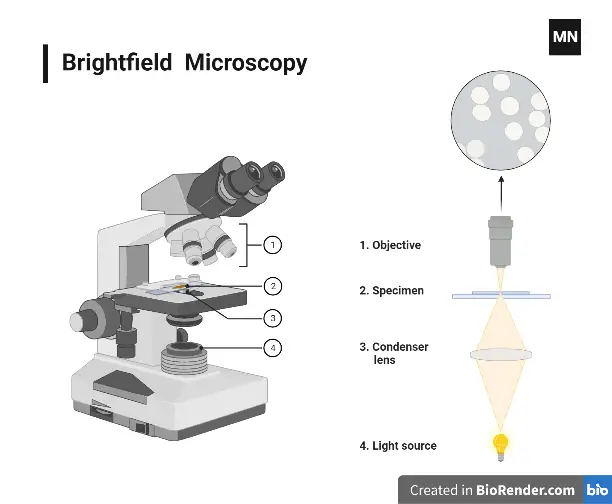
- Brightfield Microscopes – Brightfield light microscopes are most frequent. The filters focus the light that goes through the specimen. It’s often used to look at specimens that are stained or naturally colored.
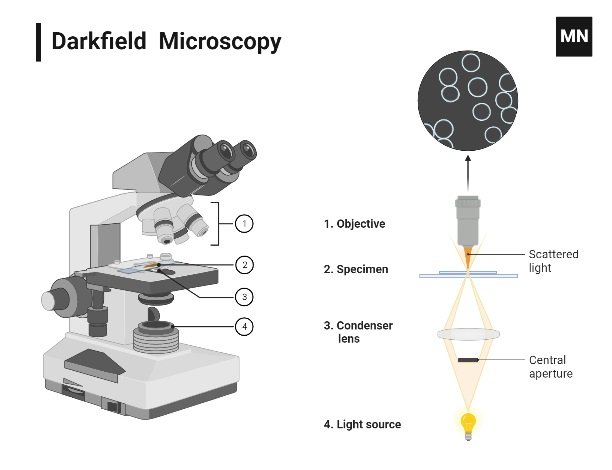
- Darkfield microscopes– These let you see things that you can’t see with a brightfield microscope. A special lens called a condenser lens bends the light in a way that makes the object stand out against the dark background.
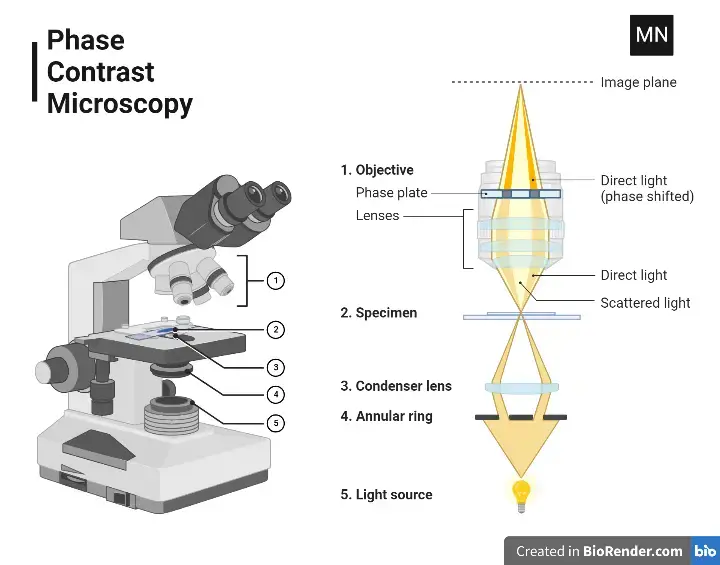
- Phase-contrast microscopes– Phase-contrast microscopes are helpful for studying living cells because they improve contrast without requiring staining. This kind of microscope makes the changes in the refractive indices of different parts of cells stand out more.
- Differential Interference Contrast (DIC) – Used for thick or live specimens. The pictures it gives look like they are in 3D, and surface details stand out. It gives unstained objects more contrast and is sometimes called Nomarski interference.
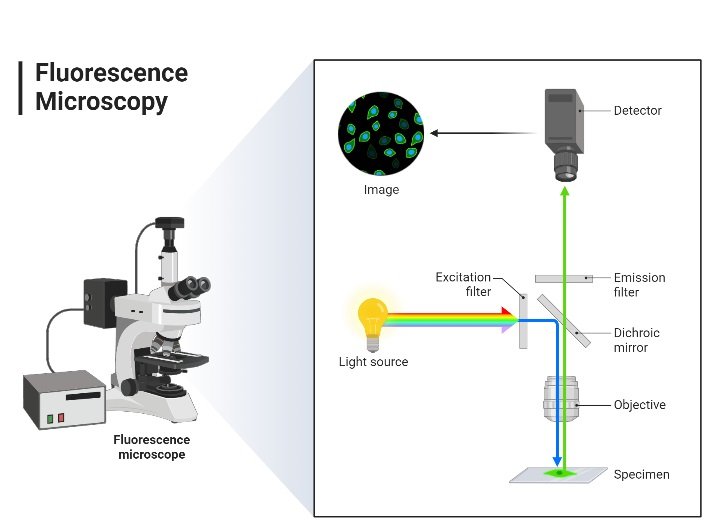
- Fluorescence Microscopes – The fluorescence microscope works by exposing the sample to high-energy light, which stimulates the sample’s fluorophores, causing them to release light with a distinct wavelength. It’s used a lot in biological studies to mark and keep track of certain structures or proteins.
- Confocal Microscopes – Confocal microscopes use laser light to scan specimens and provide high-resolution images at varying depths. Optical sections made possible by confocal microscopy make it easier to look at thick material.
- Stereomicroscopes (Dissecting Microscopes) – Stereomicroscopes, also called “Dissecting Microscopes,” are different from other types of microscopes because they have low magnification, usually 10x to 40x. It’s great for seeing bigger things in three dimensions, like flowers or bugs.
- Polarizing microscopes– Geology and materials science are the main fields that use these. Polarized light is used by the microscope to make the contrast of clear objects or minerals stronger, which shows details that were previously hidden.
- Tandem Microscopes: Several different kinds of microscopes are sometimes put together in one setup. These are often found in high-tech study labs that use a lot of different observation methods to do complex analysis.
- Digital Microscopes: These microscopes have cameras that make it easy to take pictures and look at them on a computer screen. They might use both light and other image methods, such as fluorescence.
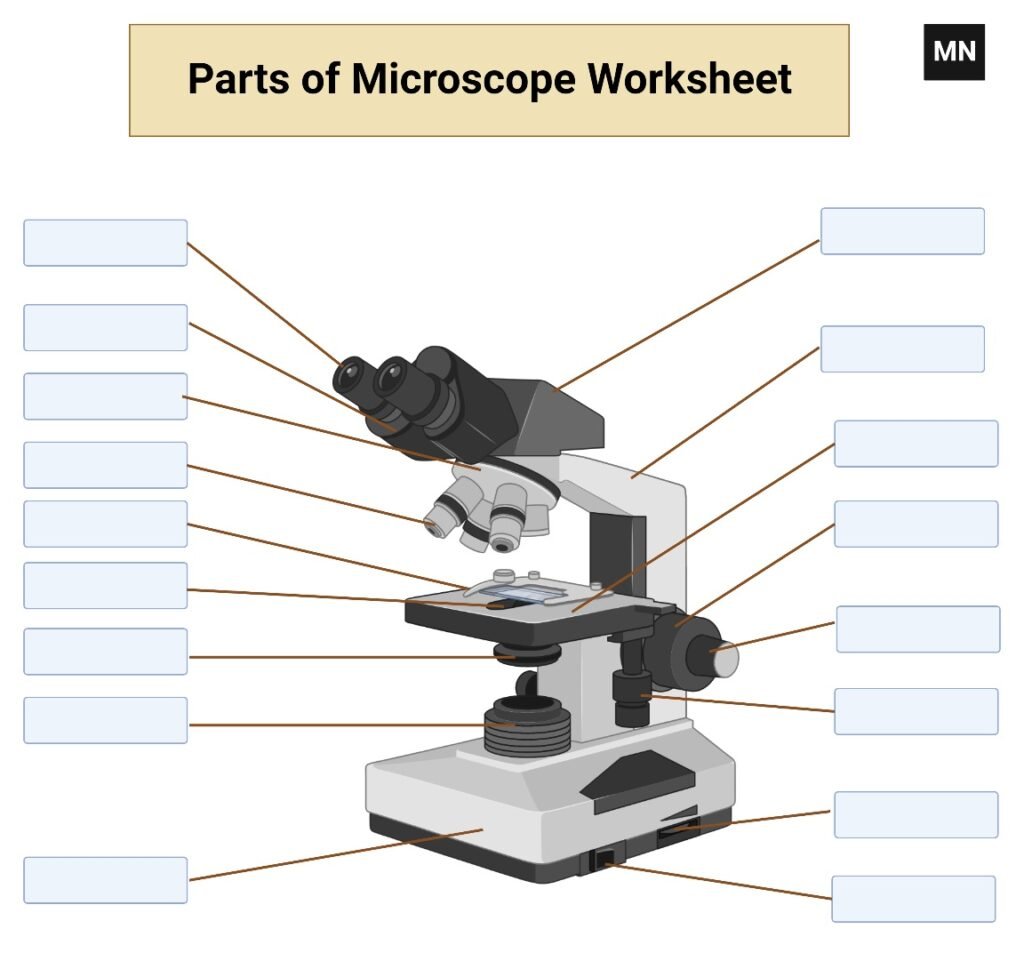
Parts of a Light Microscope
- Eyepiece – This is the lens you look through. It usually makes things 10 times bigger, but it can be different. It’s sometimes called the ocular lens.
- Objective lenses – These are the lenses that are nearest to the specimen. They have different powers to make things bigger, usually 4 times, 10 times, 40 times, and sometimes 100 times. These lenses let you zoom in on your specimen.
- Revolving nosepiece – It is a circular part that carries the objective lenses. You can turn it for lens change to change magnification easily.
- Stage – This is the flat part on which you place your slide. The stage often has clips that hold your slide in position.
- Coarse adjustment knob – A large knob that moves the stage up and down to help focus the specimen when using low magnification. It is used for general focusing.
- Fine adjustment knob – A small knob that is used after the coarse adjustment, helps to make the focus clearer for better detail.
- Condenser – A lens that directs light onto the specimen. Some microscopes have a diaphragm to adjust how much light goes through.
- Illuminator: The source of light, which can be fitted into the microscope or attached as a separate. It usually illuminates the specimen from below.
- Arm: This is the connection between the eyepiece and the body of the microscope and the base. It is for carrying the microscope safely.
- Base: The lower part that holds the whole microscope. It’s usually heavy in order to hold the instrument stable.
- Diaphragm – A disk with holes that controls how much light gets to the specimen. It helps make the image clearer and easier to see.
- Mechanical Stage – In some models, this is a tool that moves the slide left and right and up and down for better control when looking at the specimen.
Operating Procedure of Light Microscope
Operating a light microscope requires caution in handling the process to ensure accurate observation without damaging the sample or the instrument. The steps involved in using the light microscope are shown below.
- Prepare the workspace: Always clean the working space before setting up the microscope. Ensure the microscope is situated on a steady, firm base and not near dust or things that may be distracting. See to it that there is available power and then adjust the lights if necessary.
- Inspect the microscope assembly – Ensure that the objective lenses are tightened in and that the eyepiece is properly installed on the microscope. Check if the illuminator works and light intensity is controllable.
- Prepare the specimen. Mount the specimen on a clean slide for viewing under the microscope. Color or fix the sample if necessary to do so. It can also be covered by using a cover slip for its protection and to prevent movement during microscopic viewing. Prepare the specimen by getting the living organism ready to look at.
- Place the slide on the stage-Place the prepared slide on the microscope’s stage. Lock it using the stage clips so that it does not move from the place. Keep the slide centered under the objective lens to avoid missing some parts of the sample.
- Adjust the diaphragm and light source – Switch the diaphragm to regulate the amount of light that hits the sample. Start with minimal light and alter it if necessary. The condenser must be aligned to send light to the specimen for clearer viewing.
- Choose the objective lens – Start with the lowest magnification lens, usually 4x or 10x. This helps you see a wider view of the sample before looking closer for more detail. Turn the revolving nosepiece to change to the right lens.
- Use the coarse adjustment knob – Begin focusing by turning the coarse adjustment knob. This raises or lowers the stage to make the specimen approximately clear. Do not force the knob too much – turn it slowly to avoid damaging the lens or sample.
- Use the fine adjustment knob to make your specimen sharper and clearer. When the specimen is nearly in focus, you use a fine adjustment knob for it to become even sharper and clearer. You can get the details of the specimen without moving the stage too much.
- Change the focus when using higher magnifications: If you wish to use a higher magnification (such as 40x or 100x), make a new adjustment on the fine focus. At these higher magnifications, a small depth of field is generally present, and higher magnifications generally require more sensitive focusing.
- Observe the specimen- After focusing the specimen, examine its details. Identify cellular structures, organelles, or other features of interest. Make appropriate adjustments in the light intensity or diaphragm to improve contrast and resolution.
- Move the slide, if necessary- You will be able to see all the different parts of the specimen if you move the slide. Use your model’s mechanical stage controls to move the slide in order to see your sample moving smoothly and under controlled motion beneath the lens.
- Turn off the microscope when finished – After completing your observation, turn off the light source and lower the stage. Remove the slide from the stage carefully. Turn off the microscope and clean any lenses if necessary.
- Clean the lenses – If the lenses are dirty, use a lens paper to clean them lightly. Avoid using any harsh material that may scratch the lenses. Cover the microscope when not in use to protect it from dust.
Advantages of Light Microscope
- User-friendly – Light microscopes are easier to operate than an electron microscope. They actually allow beginners to use them effectively.
- Cost-effective – Light microscopes are more affordable compared to electron microscopes. This makes them accessible to education institutions and labs.
- Requires less intense preparation: Sample preparation needed for light microscopes is minimal, thus a specimen can be seen in its original form.
- Viewing live specimens: The specimens that are alive can be observed directly in a light microscope but dead specimens must be used for the electron microscope.
- Applications: In medicine, biology, and material science, the light microscope can clearly produce images of cells, bacteria, and minerals.
Non-destructive: Since it does not emit harmful radiation, specimens may be preserved for repeated observations. - Portable – Light microscopes are portable and lightweight. This makes it easy to carry them around in the field, unlike the more cumbersome equipment.
- Low maintenance – Because light microscopes have fewer parts, they require very little maintenance, mostly just lens cleaning and checking alignment.
- Quick imaging – It takes a shorter time to take an image, unlike the time-consuming process of electron microscopy.
- Flexible magnification – Light microscopes have a set of objective lenses to provide different magnifications for both high and low resolution.
Limitations of Light Microscope
- Light microscopes can only discern objects down to 200 nanometres due to visible light wavelength. This makes it difficult to see molecules or viruses.
- Even with the highest-powered objective lens, light microscopes cannot magnify specimens beyond 1000x to 2000x, making them unsuitable for studying ultra-small organisms or cell structures.
- Light microscopes’ limited depth of field makes focusing on thick specimens challenging. Electron microscopes have a deeper field for thicker materials.
- Higher magnification reduces resolution, making it harder to capture a clear image of the specimen, especially in poorly prepared or discolored samples.
- Light microscopes may not provide enough contrast for clear cells or tissue. While staining can help, it may not solve the issue.
- You can see multiple specimens, but they must be tiny enough to fit under the microscope. This restricts cellular and below-cellular research.
- Proper lighting is essential for microscope performance. The image will be dark and lose details without proper lighting.
- Light microscopes can see exterior characteristics and some inside structures, but they can’t see organelles or internal structures in depth without additional preparation.
- Light microscopes can see live specimens, however some staining methods can be poisonous or change the specimen’s structure, impairing the observation.
- In labs with many units, light microscopes take up room despite being smaller than other advanced imaging instruments. They may not be as small as handhelds.
Uses of Light Microscope
- Biological research – Light microscopes are significantly important for examining cells, tissues, and microorganisms, like bacteria, fungi, and plant cells, for understanding the cell structure.
- Medical diagnosis – In medical science, pathologists make use of the light microscope for examining tissue samples, such as a biopsy, in order to determine diseases like cancer or infections.
- Microbiology – Light microscopes in the microbiology laboratory help observe bacteria, viruses indirectly, and algae, aiding in species identification and tracking antibiotic or environmental effects.
- Histology – Light microscopes are essential for studying tissue structure by examining thin, specially prepared, and stained slices of biological tissue.
- Botany– Using light microscopes in botany allows one to view the different types of cells, tissues, and structures like leaves, stems, and flowers. Researchers may then view how the cells are arranged in such structures as well as their features in the different organs.
- Education– Light microscopes are generally used in schools for teaching cellular biology, genetics, and microbiology by direct specimen observation.
- Forensic science – Forensic analysts use light microscopes to study samples of hair, fibers, and particles found in crime scenes in order to assist in suspect identification and the overall understanding of crime.
- Pharmaceutical research – Light microscopes enable scientists to see cell or bacterial reactions to drugs, which will help them understand the effects before clinical trials.
- Environmental science – Light microscopes examine pollutants and microorganisms in water or soil, helping scientists monitor ecosystem health and detect harmful algal blooms.
- Material science: Researchers use light microscopes in the study of materials’ microstructures, which would help to understand properties, flaws, and applications.
- Quality Control in Manufacturing Quality control checks the products microscopically across industries. Raw material purity is checked, which includes a check on finished product integrity and manufacturing standards.
Light Microscope Free Worksheet