The darkfield microscope dates back to the early 19th century with some of the developments in optical microscopy. It was then that scientists started conducting experiments on different illumination techniques in a quest to maximize contrast for observing transparent and fragile specimens. Toward the late 1800s, the darkfield technique became quite popular, especially when live microorganisms and unstained biological samples were observed.
This was also the period when the bright-on-dark effect, due to the introduction of the darkfield condenser, came into the picture. This was a revolutionary method through which researchers could study living cells and tiny structures without staining, which often changed or killed the specimens.
Over time, the technique was perfected and evolved into an essential tool in microbiology, cytology, and materials science. Today, darkfield microscopy stands as a valuable method for observing minute details, drawing upon a legacy of continuous innovation.
What is a Darkfield Microscope?
A darkfield microscope is an optical device that highlights specimens by making them appear bright against a dark background, ideal for viewing transparent or unstained samples.
A darkfield microscope is a type of optical microscope that uses a special technique to illuminate the specimen, making it appear bright against a dark background. This technique is particularly useful for observing transparent or unstained specimens. Below are some points about darkfield microscopes:
- Illumination method – It directs light so it doesn’t enter the objective lens directly, only scattered light from the specimen is seen.
- Useful for Viewing– small, delicate samples like bacteria, blood cells or other transparent organisms.
- They don’t require staining– which helps in preserving the natural state of live samples.
- Contrast enhancement: It’s mainly used for samples with low inherent contrast.
- The light source– is often a bright LED or halogen lamp, modified with a darkfield stop.
- Often paired with– other microscopy techniques for comprehensive analysis.
- It’s widely used in – microbiology, cytology, and materials science.
- Not suitable for– thick or highly absorbent samples, as they may block light completely.
Principle of the Darkfield Microscope
The principle behind the darkfield microscope is quite simple, yet effective. It works by blocking out the direct light source, causing the light to scatter when it hits the specimen. In this setup, the objects that have refractive values close to that of the background will appear bright against a dark backdrop, making them easier to view.
Like most microscopes, the darkfield microscope operates based on light interactions. When light hits an object, the rays scatter in all directions, or azimuths. The special design of this microscope removes the scattered light, also known as zeroth order, so that only the scattered beams reach the specimen.
To achieve this, a condenser and/or stop is placed beneath the stage. This ensures that the light rays strike the specimen from different angles, rather than just directly from above or below. The light, scattered in various directions, creates a “cone of light” that interacts with the specimen.
When the rays diffract, reflect, or refract off the object, the result is an image in dark field—where the specimen appears illuminated against a dark background. It’s a clever way to enhance contrast without needing a direct light source to shine on the object. The principle of this microscope relies heavily on how the light interacts with the sample.
LED illuminators- often used in dark field microscopes, are specially designed to complement this unique light-scattering phenomenon. The scattered rays hit the sample, allowing for a better view of objects that would otherwise blend in with the background.
In a stereoscopic microscope, the light path is arranged differently, and the results—though related—aren’t the same. The design of a dark field microscope specifically eliminates the direct light rays, focusing on only the scattered rays, thus making it distinct.
It’s a fascinating process, right? Instead of just blasting the sample with light, the darkfield method creates an illusion that the specimen is floating, highlighted against a pitch-black background. Definitely an interesting approach!
How does Darkfield Microscope Works?
- Darkfield microscopy – It works by illuminating the sample at an oblique angle using a special light source.
- The light is scattered by the specimen, and the scattered rays reach the objective lens. The result is a bright, illuminated specimen against a dark background.
- The condenser lens- It plays a big role in darkfield illumination. It has a special diaphragm that ensures light doesn’t directly enter the objective lens.
- Just like most microscopes, the objective lens captures the scattered light – that’s how the image is formed.
- It helps in viewing objects that are too small or have very low contrast – such as bacteria or fine details of a cell.
- The sample is usually very thin and unstained, so, yeah, it’s ideal for live specimens.
- LED illuminators – commonly used to produce the right amount of light for darkfield. Some systems use halogen or tungsten lamps too.
- It’s often used in microbiology or medical research – allows fine details to be visible without needing dye.
- Another thing, Darkfield microscopes provide high contrast and detailed images, which are great for objects that are transparent or nearly invisible in other lighting conditions.
- Light passes through the sample from the sides, and the center doesn’t collect any light – hence the dark background.
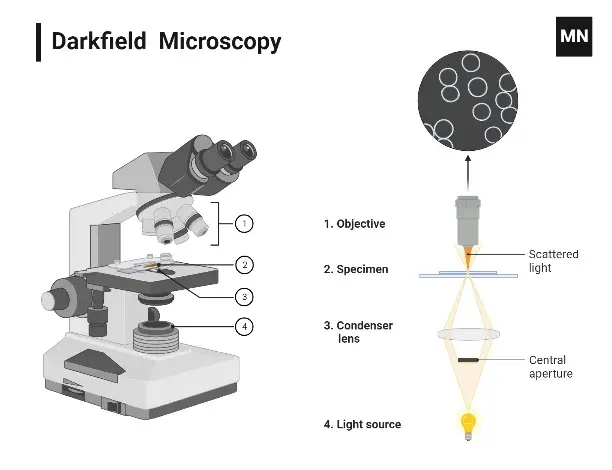
Parts of Darkfield Microscope
- Condenser lens – The key part for darkfield; directs light at an angle so that only scattered light enters the objective.
- Illuminator – Provides the light source. LED illuminators are commonly used, but some systems still use more traditional halogen bulbs.
- Objective lens – This is where scattered light is gathered, creating a contrast-rich image, and usually has higher magnification.
- Stage – The flat platform where the sample sits; it’s adjustable so you can move the specimen around to examine it.
- Diaphragm – It’s part of the condenser; it controls the amount of light hitting the sample, crucial for the darkfield effect.
- Eyepiece – The lens through which you view the image. It magnifies the image created by the objective lens.
- Base – The bottom part that holds everything together. It usually houses the light source and provides stability.
- Arm – Connects the stage and the base, and supports the eyepiece and other parts.
- Mechanical Stage – Some advanced darkfield microscopes come with this for precise control of specimen position, often used in research.
- Focus knobs – These control the sharpness of the image by adjusting the distance between the stage and objective lens.
- Mirror – Reflects light from the illuminator into the condenser, helping to direct it properly for darkfield effect.
Operating Procedure of Darkfield Microscope
- Set up the microscope – Place your darkfield microscope on a stable surface, ensuring that the power is off before connecting the light source.
- Select appropriate lighting – Turn on the light source, typically an LED or halogen bulb, and adjust the brightness to a moderate level.
- Adjust the condenser – Make sure the condenser is properly aligned for darkfield illumination. Adjust it so that the light enters the sample at an oblique angle.
- Position the sample – Place the specimen on the stage. If you have a mechanical stage, use the controls to place the sample precisely in the centre.
- Set up the diaphragm – Adjust the aperture diaphragm under the condenser to ensure that only scattered light reaches the objective lens.
- Choose the objective lens – Start with a low magnification objective lens and gradually increase magnification as needed.
- Focus the specimen – Using the coarse focus knob, bring the sample into rough focus. Then, use the fine focus knob to get a clear, sharp image.
- Observe the image – Look through the eyepiece and fine-tune the focus as required. You should see a brightly illuminated specimen against a dark background.
- Adjust light and contrast – If the image is too dark or too bright, adjust the light intensity and diaphragm. Fine adjustments ensure optimal contrast.
- Switch to higher magnification – Once the image is focused, switch to a higher magnification lens to observe finer details of the specimen.
- Record your findings – Take notes or capture images if your microscope has a camera attached.

Operating Procedure of Darkfield Microscope
- Prepare the sample- Position your specimen on the stage, centering it correctly. Clean and align it to view clearly.
- Switch on the Microscope- Power on the system and check if the light source is on. This is the step to ensure that the microscope is ready for use.
- Adjust the Illumination- Tune the light source. If using LED illumination, check if it is bright enough to offer the best contrast. The light needs to be angled so that it does not penetrate the objective lens directly.
- Adjust the condenser- The condenser needs to be set up correctly for darkfield microscopy. This will allow the light to go through the sample instead of directly into the lens. Raise it up high so that it will do that.
- Check the diaphragm –it needs to be small, focusing light around the edges of the sample.
- Select the objective lens- Like most microscopes, choose the correct objective lens- typically 40x or 100x for darkfield work. Mount and focus with the coarse adjustment knob. The fine adjustments can be made afterwards.
- Fine Focus- To enhance the resolution of the image even more, turn the fine focus knob. The sample should be bright against a dark background. Note that the resolution is very sensitive to contrast, and darkfield is no exception.
- Adjust the Aperture- Now adjust the aperture to maximize the contrast. Darkfield microscopy is fundamentally about showing the edges of your sample while keeping the center in obscurity. Be careful not to overdo this; it might become too blinding.
- Observe the Sample— Finally, look at your specimen. The edges should be bright, while the center should be shrouded in obscurity. If you cannot see a sharp edge, you may need to fine-tune the condenser or objective lens.
- Switching Between Objectives- If you want to zoom in, switch carefully to a higher magnification. Be sure to refocus after changing objectives. Do not move the stage too abruptly when changing lenses.
- Cleanup- When finished, carefully remove the specimen. Switch off the illumination and power down the microscope. Cover the microscope with a dust cover to protect the lenses from dust buildup. Clean the lenses gently with lens cleaning tissue to prepare for the next session.
Uses of Darkfield Microscope
- Darkfield Microscopes are widely used to examine live, unstained specimens. This technique allows the observer to view translucent or transparent objects, such as bacteria or plankton.
- Used for observing the fine details of the structure of cells, especially when looking at specimens that don’t naturally have significant contrast.
- Ideal for examining thin, delicate, and small biological samples. These microscopes provide bright, almost fluorescent images, even without staining.
- Popular in microbiology and diagnostic laboratories, especially for observing pathogenic bacteria like Treponema pallidum (which causes syphilis) or the Borrelia species (causing Lyme disease).
- Helps to visualise samples that might otherwise require heavy preparation, which can often distort or kill the specimen. It’s good for live bacteria, fungi, and other microorganisms.
- Essential in detecting cell structures, particularly in medical fields, where observing bacteria or viruses can provide valuable diagnostic information.Also used in research for studying the finer details of living tissue, blood cells, or even certain types of crystals.
- The dark background that results from this type of illumination makes the sample appear bright and clear—this is especially helpful when traditional staining or contrast techniques might alter or destroy the sample.
Advantages of Darkfield Microscope
- Darkfield microscopy – it enhances contrast without the need for stains, making it easier to observe living cells.
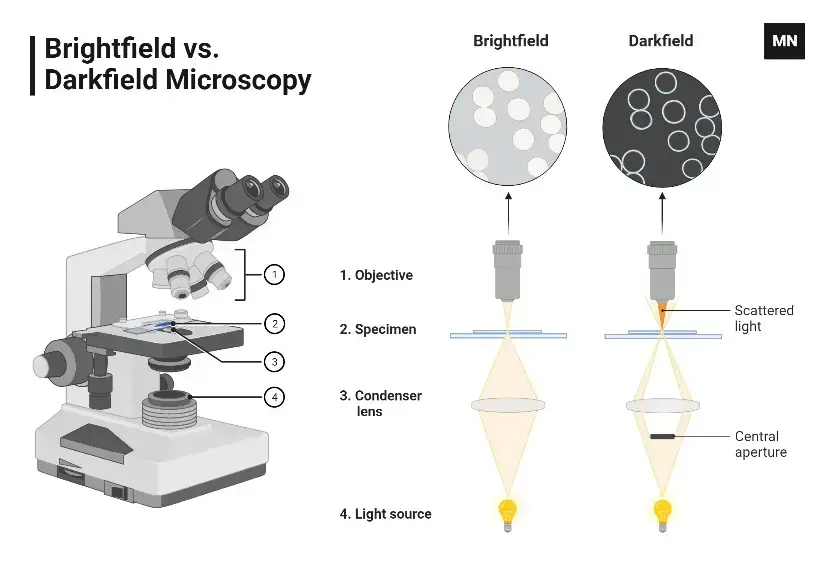
- Unlike Brightfield, it allows for the clear viewing of specimens that are nearly invisible under regular light conditions.
- No need for complex preparation methods, such as staining, which can sometimes damage delicate samples.
- The “glowing” appearance of specimens under darkfield illumination makes it easier to see fine details that would otherwise be missed.
- It’s commonly used for studying live microorganisms, bacteria, and small, transparent objects in fluids.
- Theres also the fact that this method is great for revealing edges and outlines of structures.
- High-resolution, detailed images of small or nearly transparent particles – it’s ideal for certain biological samples.
- You can view specimens in their natural, unstained state, preserving their natural structure and characteristics.
- Useful in microbiology labs, especially when working with microorganisms that don’t naturally take up stains.
- Darkfield helps with faster, more efficient imaging, particularly in fast-paced environments or when working with delicate samples.
Limitations of Darkfield Microscope
- Darkfield microscope – it can be tricky to use for thick specimens, as the contrast may not be sufficient to reveal all details.
- The light source can be quite intense, which can cause some samples to overheat, potentially damaging delicate specimens.
- It’s a bit difficult to set up, requiring precise alignment of the condenser and light source, which can be time-consuming.
- Low magnification – well, it’s not always the best choice for high-power viewing or observing structures at very fine scales.
- The images produced can sometimes appear grainy or have a low signal-to-noise ratio.
- It doesn’t provide as much depth of field as other techniques, so focusing on thicker samples can be hard.
- Darkfield microscopes tend to have a limited field of view compared to other types.
- Some specimens might appear with halo-like artifacts around them, causing distortion.
- It can be hard to interpret the images without experience, especially if you’re used to more conventional techniques.
- High cost – yes, the equipment and maintenance can get expensive, especially when compared to simpler setups.
- Because it’s a bit challenging to maintain, dirt or dust can easily reduce image quality.
- Madigan Michael T, Bender, Kelly S, Buckley, Daniel H, Sattley, W. Matthew, & Stahl, David A. (2018). Brock Biology of Microorganisms (15th Edition). Pearson.
- Procop, G. W., & Koneman, E. W. (2016). Koneman’s Color Atlas and Textbook of Diagnostic Microbiology (Seventh, International edition). Lippincott Williams and Wilkins.
- Tille, P. (2017). Bailey & Scott’s Diagnostic Microbiology (14 edition). Mosby.
- Willey, Joanne M, Sherwood, Linda M, & Woolverton, Christopher J. (2016). Prescott’s Microbiology (10 edition). McGraw-Hill Education.
- https://www.microscopemaster.com/dark-field-microscope.html
- https://en.wikipedia.org/wiki/Dark-field_microscopy
- https://www.microscopyu.com/techniques/stereomicroscopy/darkfield-illumination
- https://www.slideshare.net/abhishekindurkar/dark-field-microscopy-81857005
- https://bio.libretexts.org/Bookshelves/Microbiology/Book_Microbiology_(Boundless)/3_Microscopy
- https://www.ruf.rice.edu/~bioslabs/methods/microscopy/dfield.html