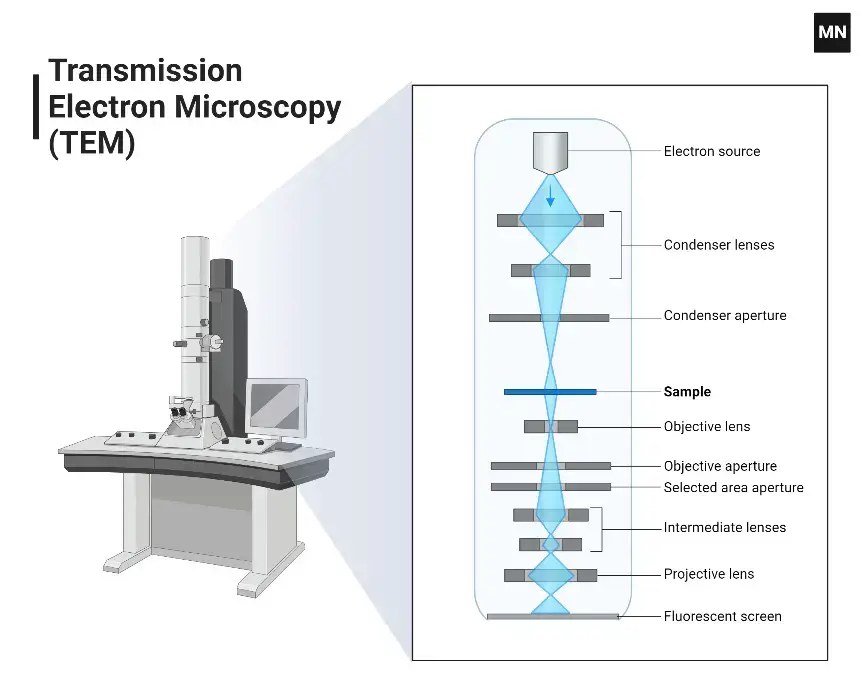
A TEM is an extremely advanced tool that uses a beam of electrons to look at and study the inside structure of thin samples at an extremely high detail. Unlike light microscopes, which use visible light, TEMs use the shorter wavelength of electrons to get magnifications that can be millions of times bigger. Here’s a summary:
- Working Principle
- A strong electron beam is directed onto a very thin sample.
- Electrons interact with the sample as they pass through, forming an image.
- The transmitted electrons (hence the name) are captured by detectors or a phosphor screen, creating a highly detailed image.
- Magnification & Resolution
- TEMs can magnify objects up to 2 million times.
- Resolutions can reach as fine as 0.1 nanometres, allowing the imaging of atomic structures.
- Sample Requirements
- The specimen needs to be extremely thin, often less than 100 nanometres.
- It also needs to be prepared with great care, sometimes needing staining with heavy metals to improve contrast.
- Applications
- It is widely used in material sciences to investigate crystal structures, dislocations, and nanostructures.
- It is crucial in biology to image organelles, viruses, or molecular complexes.
- It is used in semiconductor research to investigate thin films and interfaces.
- Advantages
- Excellent resolution of internal details.
- It can be used to determine chemical composition by methods such as energy-dispersive X-ray spectroscopy (EDX).
- Limitations
- Costly and needs considerable expertise to operate.
- Samples have to withstand the vacuum and intense electron beam, which limits their use for some materials. TEMs are among the best tools used in looking at small things; details that the best light microscopes cannot reveal can be found with them.
Why We need to prepare specimen sample for TEM?
Getting a sample ready for TEM is very important to get clear, detailed images. TEM makes use of electrons that go through a very thin sample, and so preparation goes hand in hand with care. This is why:
- Electron transparency-TEM samples need to be very thin, normally less than 100 nm, to allow the passage of electrons without excessive scattering. In any other case, the electron beam would not go through well, and the images attained would be poor or unusable.
- Artefact minimization – Careful preparation helps minimize artefacts that might distort imaging, meaning the appearance of the material reflects its inherent structure. Such artefacts might be caused by cutting or even polishing, blurring details and producing misleading structures.
- Contrast enhancement – biological or organic samples typically don’t have sufficient contrast naturally to scatter the electrons. Contrast enhancing techniques include staining with heavy metals or embedding samples in resins. Thus, the sample may be visible in the resulting image.
- Alignment of the Sample – the orientation of the sample ensures that the important features are visible and properly aligned in the path of the electron beam. This is particularly important with crystal materials and biological large molecules.
- Avoid contamination – Samples not prepared correctly could become contaminated (through dust, moisture, or fingerprints) which would change the results or ruin a sensitive instrument. Keeping everything clean maintains the accuracy of analysis.
- Preservation of the sample – TEM operates in a vacuum. The vacuum could dry out and even degrade some samples. Preparation techniques, such as cryofixation, preserve the sample state when viewed using TEM.
Sample preparation Procedure for TEM
In this method, the particle under observation is bombarded with electron beams in a transmission electron microscope, and the produced images are processed through computers.
One of the critical steps of TEM is sample preparation, and the way in which the sample is prepared is based on what the material is and what information is needed.
Specimens for TEM preparation are carried out in the following steps:
- Fixation
Fixation of the specimen stabilizes the cell, which would otherwise be changed or damaged by any further procedure. This technique fixes the sample to give a snapshot in time of the living cell. Fixation can be done by the following two methods: - Chemical fixation: Chemical fixing is a method by which biological samples are stabilized. Chemical chemicals are used to cross-link protein molecules with adjacent molecules. Glutaraldehyde is the most common chemical used for this process.
- Cryofixation: This method demands the rapid freezing of the specimen in liquid nitrogen or liquid helium. Thus, the sample’s water content gets converted into some sort of vitreous ice.
- Washing
Tissue fixing may make the specimen more acidic. This can be avoided and the pH level maintained constant by rinsing it very carefully with a buffer such as sodium cacodylate. - Secondary fixation
Osmium tetroxide highlights the minute details of the specimen and stabilizes as well. OsO4 converts proteins to gels; it increases contrast between neighboring cytoplasm due to binding towards parts of the phospholipid heads without changing its properties. - Dehydration
This involves substitution of the solvent present in the sample with the organic solvent. A few good options for organic solvents include ethanol and acetone. It is an essential process as the water can be used by the epoxy resin applied next which will not dissolve in the latter. - Infiltration
In infiltration, epoxy resin is added to the cell to fill up the space, and the sample becomes strong enough to handle pressure in cutting. This method is also known as embedding. The resin is left overnight in a 60-degree oven to harden. This process is called polymerization. - Polishing
Some of the materials, after embedding, are polished. Polishing a specimen reduces scratches and other problems that can lower the image’s quality. The specimen is polished with very fine abrasives to make a shiny surface. - Cutting
The sample is semi-transparent to be seen under an electron microscope; thus, the beams of electrons can pass through it. To cut the sample into thin slices, it is sliced with a glass or diamond knife attached to a specific tool known as an ultramicrotome. This particular tool has a container filled with pure water. These slices are assembled inside this container prior to being transported to a copper grid for scrutiny using a microscope. To properly view details clearly, each section should be between 30 and 60 nanometers. - Staining
Biological samples are usually stained twice before drying and cutting. Heavy metals such as uranium, lead, or tungsten are used for this purpose so that the different parts of the sample are differentiated to scatter the electron beams. A block form staining is done in the case of the sample before drying, while after cutting it is briefly dipped in a watery solution of these metals. Such a sample is likely to skip most of the above treatments as it can simply be cut into small pieces followed by coating the sections with platinum, gold or carbon vapors for TEM observation. Besides general preparation steps taken before TEM viewing, there is still other treatment one can utilize:- Ion-mining: In this technique, the sample is thinned by shooting charged argon ions at its surface until it becomes clear enough to see through. The process of focused ion mining uses gallium ions for thinning.
- Cross-sectional method: This technique is used primarily to examine interfaces.
- Replica technique: This is used only when the primary specimen used to prepare thin sections cannot be destroyed.
- Electrolytic polishing: It is a method used to get thin samples of metal or an alloy. Here, various techniques such as coring, rolling, grinding, and peeling are used.
Conventional Method For preparation of ultrastructure
The following is a general procedure for preparing samples for ultrastructure imaging.
- Attach first to aldehydes (proteins)
In this phase, the molecules of the fixative crosslink proteins together and to a lesser extent other structures within the cell. For smaller mammals, fixation can be accomplished by perfusion, where the fixative is directly infused into the circulating system of the animal. For other samples, the specimen will be treated by immersion, and then cut in at least one direction down to no more than 1 mm. - Secondary fixation with osmium tetroxide (lipids)
This ensures that the lipids, for example, the phospholipids forming the membranes, are not lost in the drying process. In this fixing step, there is formation of black, solid material on the membranes, which provides positive contrast. - Final fixing and contrasting with uranyl acetate
Uranyl acetate is a heavy metal salt, that is, it creates additional contrast by binding to proteins, lipids, and nucleic acids. Some authors also claim it has fixative properties. The samples can be incubated in a solution of uranyl acetate before dehydration or the stain can be applied to sectioned specimens before lead staining. - Solvent dehydration series ethanol or acetone
A specimen is dehydrated by placing it in different solutions of ethanol or acetone. The amount of solvent is slowly increased to remove water without causing damage, mainly by shrinking. - Adding and covering with resin
Once the specimens are dehydrated, even more liquid resin replaces the solvent, usually epoxy resin when ultrastructure is to be studied. The sample is then placed in a mold of liquid resin, which undergoes hardening from heat or UV light. Samples can last forever. - Cutting and mounting sections on specimen grids
The pieces can be so thin that a sample in hard resin can be divided into pieces thinner than 100 micrometres. The electron beam is passed through from the electron gun to the detector. The pieces are put on grids that fit into the microscope’s sample holder. - Contrasting (poststaining)
The atoms have low atomic numbers; thus, the biological specimens are not very electron-opaque. This means the electron beam can easily pass through them. Sections can then be stained with lead citrate to make the contrast better. This heavy metal salt adheres to cell parts like osmium tetroxide and uranyl acetate, scattering the electrons from the beam. The parts of the specimen section, which scatter more electrons, come out darker relative to a lighter background when using darker pixels.