Fluorescence microscopes—have you ever wondered how scientists capture such vivid, glowing images of cells, tissues, or even bacteria? This is where fluorescence microscopes come into play, using fluorescence and, at times, phosphorescence to reveal the hidden intricacies within both organic and inorganic materials. It is like magic, but it is based on the science of light and fluorescence.
In short, these microscopes rely on two fascinating processes: fluorescence and phosphorescence. Fluorescence is the phenomenon whereby a substance absorbs light and then emits it at a longer wavelength, which gives it a glow often so beautiful to see. Imagine it as a flash of light that disappears almost instantly. In contrast, phosphorescence is similar but occurs more slowly; the light lingers in the air for a longer time. Both are important in the operation of these microscopes, but it is fluorescence that is the main event.
Now that’s interesting: Do you know that fluorescence microscopy was at one time perceived not as an easy-to-handle instrument? At a time when the technique was still in its infancy, scientists such as August Köhler, Carl Reichert, and Heinrich Lehmann saw fluorescence primarily as an interfering element, particularly with ultraviolet microscopy. If we now jump forward to the early 20th century, Otto Heimstaedt and Heinrich Lehmann built the first practical fluorescence microscope. To their surprise, even bacteria, plant tissues, and animal cells had a natural glow!
Now that we’ve warmed up a little, let’s take a bit of a detour before discussing how fluorescence microscopy actually works. Do you know of the term “Stokes shift”? No, it’s not the latest dance craze! This shift describes a phenomenon found by British scientist Sir George G. Stokes in 1852, wherein light emitted after excitation has its wavelength shifted toward longer, lower-energy wavelengths. Stokes’ finding was fundamental in establishing the principle of fluorescence that would eventually become the basis of fluorescence microscopy.
It is like that in real life, too. When you shine ultraviolet or visible light on a sample, you are energizing the molecules within that sample so they radiate light when they relax back into their previous states. Now, here’s the neat part: The wavelength of light coming off of that molecule is greater than the wavelength of the light it had absorbed, and this is what causes that pretty glow we see with our microscope.
But that’s not all! Fluorescence microscopy is more than a visual spectacle; it is the art of labeling. To see most samples, researchers must coat them with fluorescent dyes or molecules. However, some tissues have a natural ability to fluoresce on their own; that is autofluorescence and does not require tagging. Maybe you have ever seen glowing DNA inside a cell; this is because of applying fluorescent stains, such as Hoechst or DAPI. Other dyes, such as Phalloidin, highlight actin filaments, giving us a snapshot of cell structures.
Let’s not forget about the fluorochromes – Isothiocyanate, Alexa Fluors, or Dylight 488, which are used to mark the target samples. Even antibodies can be labeled with these fluorochromes to help detect antigens.
Fluorescence microscopy has changed the way we study cells and tissues in the grand scheme of things. It’s like having a superpower: the ability to illuminate the unseen world at a microscopic scale. From understanding the inner workings of cells to investigating disease mechanisms, this technique has opened new frontiers in biological research.
Principle of Fluorescence Microscope
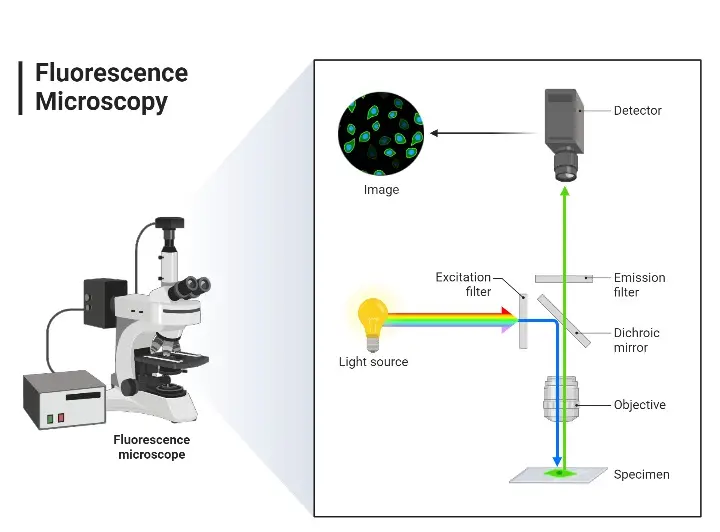
The first step of the observation of the sample in the fluorescence microscope is that the sample is tagged using fluorescent dyes. Subsequently, a white light source which is allowed to fall on the excitation filter. This particular filter selects light of a given wavelength that would be able to excite fluorescent molecules tagged within the specimen. The excitation light falls on the dichroic mirror. The reflected light from the dichroic mirror passes to the specimen when it comes out of the objective lens. These small wavelength light falls on the specimen that contains a fluorescent dye. It produces emission of the high wavelength of light which travels again through the condenser lens and dichroic mirror. This way green light in the maximum amount along with some blue passes towards the emission filter. This filter lets the longer wavelength green light enter into the eyepiece and detector but rejects all of the blue light. The detector collects this green light and reflects back through to the specimen to make the specimen emit a fluorescent green image on a black background.
Parts of a Fluorescence Microscope
- Light Source- Traditionally, it is usually a mercury or xenon arc lamp, providing an extremely bright source of light and has a very broad spectrum of light with both UV and visible wavelengths; such a broad spectrum is required for exciting a variety of fluorophores in the sample.
- Excitation Filter – It is placed in the light pathway. This filter allows through only the desirable light that excites the fluorophore into a fluorescent state, while allowing some wavelengths of the light source to pass through.
- Dichroic Mirror- It is sometimes called a dichromatic mirror or beamsplitter. The excitation light reflects onto the specimen while allowing the fluorescence emitted to pass through towards the detector. The selective reflection and transmission of dichroic mirrors are important in separating excitation from emission light.
- Objective Lens- It is a biconvex lens which serves as the lens for focusing excitation light on a specimen and collecting emitted fluorescence. Among all the lenses placed within a microscope, the objective lens has the strongest influence on the resolution and brightness of the image obtained.
- Sample Stage– This is the stage that holds the specimen and allows for accurate movement in the x, y, and z axes. This is very important for focusing or scanning areas of interest in the sample.
- Emission Filter – This is the component that the emitted fluorescence passes through after it passes through the objective lens. This filter blocks residual excitation light and transmits only the wavelengths of the emitted fluorescence, meaning that the detected signal is due to the fluorophores.
- Detector – Detectors may be photomultiplier tubes, charge-coupled devices, or any other device that converts the transmitted fluorescence into an electronic signal and would eventually be processed to form an image. The detector chosen determines the sensitivity and resolution capabilities of the imaging system.
- Eyepieces and Camera- The eyepieces are used to allow direct observation of the specimen by the naked eye of the observer. The camera makes images, thereby recording and further analyzing. Many modern systems have the camera built into the optical path, thus permitting simultaneous viewing and imaging.
Types of Fluorescence Microscope
- Wide-field Epifluorescence Microscopy- In this approach, the entire sample is illuminated simultaneously by the excitation light. This is a simple technique commonly used for routine fluorescence imaging.
- Confocal Microscopy- Here, the source of light is a laser that scans the specimen point by point and collects emitted light through a pinhole that removes unwanted out-of-focus light. It produces high-resolution optically sectioned images.
- Multiphoton Microscopy – Here, two or more photons of lesser energy excite fluorophores, and it has deeper penetration into the tissue with less phototoxicity. It is useful mainly in imaging thick samples.
- Total Internal Reflection Fluorescence (TIRF) Microscopy– TIRF microscopy restricts illumination to the near-surface region of the specimen alone. It is used to study cell membrane and interfacial interactions.
- Epi-fluorescence Microscopes – Here, the illumination and detection happen from the same side of the specimen. They are utilized in routine fluorescence imaging.
- Inverted Fluorescence Microscopes – Objectives and the light source are attached from below to observe the living cells right within the culture dishes.
Operating Procedure of Fluorescence Microscope
The working of a fluorescence microscope requires extreme care so that the images produced are highly accurate and the sample is not compromised. Below is a general protocol for working with a fluorescence microscope:
- Sample Preparation- Verify that the sample has been appropriately prepared and stained with appropriate fluorophores.
- Slide Placement- Place the sample on an uncontaminated microscope slide and place a cover slip over it.
Microscope Setup: - Power On- Turn on the main power supply and then turn on the microscope using the power switch located on the right side of the base. Engage the illumination source, which could be a mercury or xenon lamp, by pressing the ‘LIGHT ON’ button. Choose the appropriate objective lens, such as 10X, 20X, 40X, or 100X, by turning the objective selection wheel. Adjust lighting and filtering
- Excitation Filter– Select appropriate excitation filter according to fluorophore in use.
- Dichroic Mirror: Mount dichroic mirror so as to reflect the exciting light towards sample and reflected fluorescent light towards the detector.
- Emission Filter – Set emission filter to pass light of specific wavelength emitted by fluorophore
- Coarse Focus – Use the coarse focus knob to bring sample into general focus.
- Fine Focus – Fine-tune the focus with the fine focus knob for clear image clarity.
- Adjust the Illumination – As required, change the intensity of illumination for ideal brightness in the image
- Capture Images – Utilize the camera system to take images of the fluorescence.
- Overlay Channels– In case imaging multiple fluorophores, overlay the images for visualizing colocalization
- Turn off the Light Source and Microscope– Turn off the light source and microscope once imaging is completed.
- Save the Captured Images and Data– Save and backup all captured images and data.
- Clean-up– Wipe the microscope stage and other parts that could have been in contact with the sample.
Applications of Fluorescence Microscope
- Cell Biology – In cell biology, scientists commonly use fluorescence microscopes to observe various parts of cells, including proteins, nucleic acids, and lipids. These parts can be tagged with fluorescent tags.
- Immunofluorescence – The microscope enables researchers to use specific antibodies that are attached to fluorescent dyes to identify antigens in tissue or cell samples. Such techniques are also commonly applied in diagnostics.
- Live Cell Imaging– Unlike the conventional microscopes, fluorescence microscopes can be used for live cell imaging. It is feasible to observe living cells in real time using the appropriate fluorescent dyes, which will provide an understanding of division, movement, or apoptosis processes.
- Molecular Biology– The method is also used in molecular biology to study gene expression, localization of proteins, and their interactions inside the cells. Fluorescent probes are used to track interactions at the level of molecules inside the cell.
- Biomedical Research – In research related to cancer, infection, and neurological diseases, the fluorescence microscope helps identify specific cell markers or track pathogens. It helps with identifying the location of biomarkers in tissue samples.
- Microbial Detection – For microbiological studies, fluorescent microscopes enable the detection of specific microorganisms by labelling with fluorescent dyes. It helps in detecting bacteria, fungi, viruses etc. This is often more sensitive than traditional light microscopes.
- Environmental Studies- Fluorescence microscopy is applied to environmental samples such as water, air particles, or soil. It enables the tracking of microorganisms or pollutants through the use of fluorescence markers. Like other microscopes, it provides critical information on biodiversity of ecosystems.
- Forensic Science – In this science, fluorescent microscopes are used to study biological evidence, like blood or fibers, in crime scenes. It can also reveal traces of drugs or harmful substances in hair or tissue samples.
- Pharmaceutical Industry – Researchers use fluorescence in drug development in order to know how drugs work with cells or how the shape of different kinds of cells is changed.
- Fluorescence Microscopy- Imaging Specifics – Different types of fluorophores, such as those mentioned, exist for fluorescence microscopy. During marking and visualization of living cells, some of them are used. These selections of dyes become dependent on a sample; whether one requires finer details or how it is meant to be used.
Advantages of Fluorescence Microscope
- High Sensitivity – Fluorescence microscopes are very sensitive. They can see extremely low amounts of light, which helps find very small amounts of biological molecules. This is one reason why they are highly popular in diagnostic research.
- Multicolour Imaging – This is a huge advantage! Multiple fluorescent dyes can be used simultaneously, allowing the observation of several components in a single sample. This helps in visualising complex interactions or co-localisation of molecules. Like most light-based microscopes, the clarity of the image doesn’t suffer with the addition of more colours.
- Non-invasive – Fluorescence microscopy typically does not damage cells. It is particularly useful for examining living cells. Scientists can observe cells or tissues with minimal damage. This is extremely useful for observing living biological processes!
- High Resolution Imaging – Using the proper equipment and fluorescent labels, fluorescence microscopes can obtain clear images. This allows scientists to view the small details of cell structures, sometimes even at a molecular level.
- Quantitative Analysis – Fluorescence microscopy lets us measure things accurately, like how strong the fluorescence is. This helps us check how much of certain molecules are in a sample.
- Deep Tissue Penetration – Regular fluorescence does not go deep into tissues, but new methods like two-photon microscopy allow us to see deeper in thicker tissue samples. This has greatly helped its use in biomedical research.
- Versatile – Fluorescence microscopes can be used for a wide range of applications, from examining the cell and tissue structure to watching active processes like how enzymes work and how genes are expressed.
- Speed – Fluorescence microscopy can give results relatively quickly, especially when looking at live images, which is useful for observing fast biological processes such as cell division or changes in protein activity.
- Specificity – Fluorescence allows for the identification of molecules clearly. Once specific antibodies or molecules are tagged with fluorescent dyes, it is easier to find and trace proteins, DNA, and other parts of the cell in mixed samples.
- Excellent For Small Samples – It is useful for small sample sizes or even when working with small amounts of material. This technique can easily detect even the smallest amount of a labelled molecule, which makes it popular for single-molecule imaging applications.
Limitations of Fluorescence Microscope
- Photobleaching – Photobleaching is the phenomenon of degrading fluorescent dyes with time under the influence of light. This limits both the time of observation and quality of long-term imaging. Once a fluorophore loses its brightness, the image obtained is very difficult to interpret.
- Low Penetration Depth – Although there is tremendous progress in the invention of two-photon microscopy, fluorescence microscopes cannot still penetrate deep in thick specimens. This limits observing some tissues or organisms at depth unless special techniques are used.
- Fluorescence Overlap – Many fluorophores could emit light in similar wavelengths that lead to overlap in fluorescence. This causes confusion in multi-color imaging and does not distinguish easily between the various components in the sample.
- Complex Sample Preparation- Much of the work of preparing samples for fluorescence microscopy requires the use of labeling with specific dyes or antibodies. This alone could be a rather time-consuming process and thus prone to mistake, especially with living cells.
- Costly Instrumentation-The expensive fluorescence microscopes that are required in techniques such as confocal or two-photon microscopy may be very costly for some laboratories and, therefore, impractical to purchase.
- Requires Highly Skilled Operation – Fluorescence microscopy is not as straightforward as compared to the use of a regular light microscope. It requires an immense level of skill in setting up the microscope correctly, picking the proper dyes, and interpreting results accordingly. Proper conditions might not be met if a misinterpretation may occur.
- Phototoxicity –The reason for phototoxicity is that light needed to excite fluorescent dyes will damage the living cells. In fact, longer illumination at a higher intensity puts a sample in jeopardy, particularly with sensitive or living cells. Thus, it becomes problematic in maintaining prolonged imaging for specific research.
- Signal-to-Noise Ratio – In other cases, background fluorescence may compete with the signal created by labeled molecules and, consequently, may lead to lower signal-to-noise ratio. Blurring images caused by interference from background fluorescence might make it very hard to determine faint signals.
- Limited by the Properties of Fluorophores – Again, the brightness, stability, and photobleaching rate of the fluorophores determine the qualities of images that can be acquired. If the wrong dye is used for a sample or an experiment, the resultant data may not be very accurate or entirely easy to understand.
- Size and Portability – As compared to relatively simple microscopes, fluorescence microscopes tend to be fairly large and immobile, and this may hinder their use in field studies or anywhere mobility is paramount.
- Depth of Field – Fluorescence microscopes often possess a shallow depth of field especially when high magnification is utilized. This property makes it difficult to obtain a proper image of more substantial samples, especially without adjusting the focus from one plane to another.
- Sanderson MJ, Smith I, Parker I, Bootman MD. Fluorescence microscopy. Cold Spring Harb Protoc. 2014 Oct 1;2014(10):pdb.top071795. doi: 10.1101/pdb.top071795. PMID: 25275114; PMCID: PMC4711767.
- https://conductscience.com/fluorescence-microscopy/
- https://serc.carleton.edu/microbelife/research_methods/microscopy/fluromic.html
- https://www.thermofisher.com/in/en/home/life-science/cell-analysis/cellular-imaging/evos-cell-imaging-systems.html
- https://microscopeinternational.com/fluorescence-microscopy/
- https://www.microscopyu.com/techniques/fluorescence/introduction-to-fluorescence-microscopy
- https://www.semrock.com/introduction-to-fluorescence-filters.aspx
- https://www.slideshare.net/VIVEKKUMARSINGH109/fluorescence-microscopy-72205439
- https://www.slideshare.net/doctorrao/fluorescent-microscopy
- https://en.wikipedia.org/wiki/Fluorescence_microscope
- http://www.scholarpedia.org/article/Fluorescent_proteins
- https://pubmed.ncbi.nlm.nih.gov/18228363/
- https://www.ncbi.nlm.nih.gov/pmc/articles/PMC4711767/