Phase-contrast microscopy transforms subtle variations in refractive index and cell density into noticeable changes in light intensity, allowing researchers to study living cells.
The microscope is a microscope for viewing cell culture and live cells. Living cells can be seen unstained.
Unstained specimens have absorbed no light, so it produces very small differences in the intensity distribution in the image. So in brightfield, the specimen cannot be viewed very well.
Due to a slight phase shift when light travels through specimens, which is invisible to our human eye.
Phase contrast microscopy then converts these phase shifts into alterations in amplitude, which are distinguishable as variations in image contrast.
The phase concept was discovered by the Dutch physicist Frits Zernike at the University of Groningen in 1932. He wrote of its use in microscopy in 1935. He received the Nobel Prize for physics in 1953 for that. With the use of a special filter in the condenser, Zernike filtered undiffracted light from the specimen from diffracted light from the specimen.
He used a special plate on the back focal plane of the objective lens and changed the phase of the direct light to make it up to 4 times out of phase with the diffracted light. The increased interference between the direct and the diffracted light in the intermediate image plane created visible amplitude contrast for the microscopist.
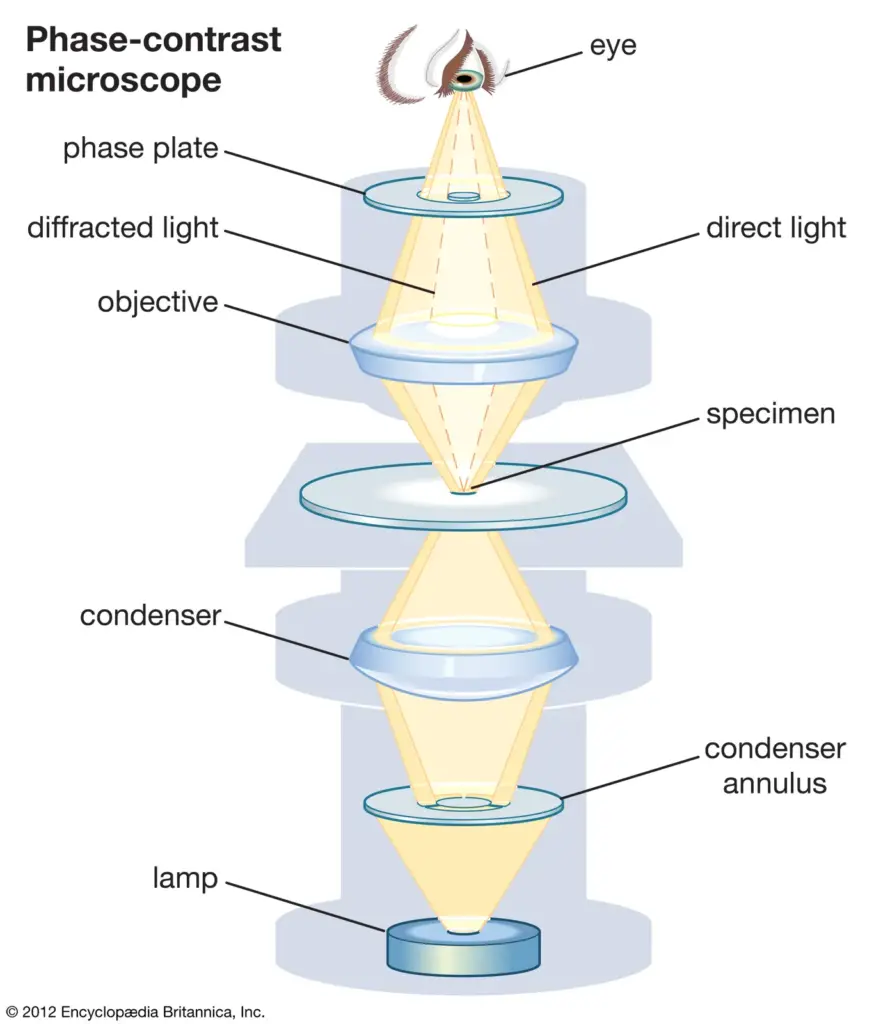
Principle of Phase contrast Microscopy
- The condenser of a phase-contrast microscope is equipped with an annular stop, which is an opaque disk having a thin transparent ring that forms a cone of light with a hollow interior.
- As part of this cone travels through a cell, some light rays are refracted because of the density and refractive index variations within the specimen and are therefore ‘retarded’ by a quarter wavelength. The deflected light is focused to create an image of the object.
- The undeviated light rays strike a phase ring in the phase plate, a specialized optical disk located in the objective, while the deviated rays bypass the ring and pass through the remaining part of the plate. The undeviated light that hits the phase ring is advanced by 1/4 wavelength when passing through this ring.
- The deviated and undeviated waves become a half wavelength to each other and will cancel each other out to come together to form an image. And so diverged and undiverged lights of separate image.
- The background consists of undiffracted light and is bright; the object, being unstained, is dark and well defined.
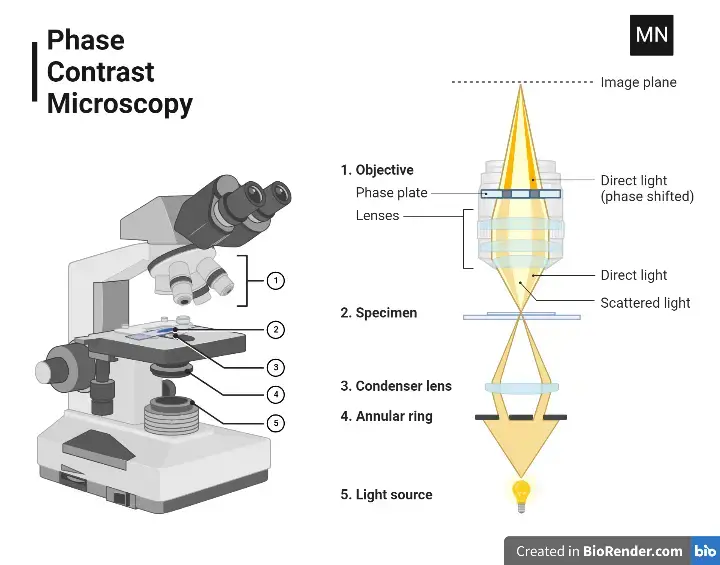
Light Path of Phase Contrast Microscope
- The light rays emit from the light source and are received by the annular diaphragm.
- And then, it went through the condenser lens that concentrated the rays on the specimen.
- Light is transmitted through the specimen and onto the objective lens, where an image of the specimen is formed.
- When light is passed through the specimen, it becomes deviated and non-deviated light rays.
- These rays of light deviate and thus avoid the phase ring above the objective lens.
- While the undeviated light rays hit a phase plate. Consequently, deviated and undeviated rays created separate images.
- While the stray light rays provided the background of the specimen’s image.
Types of Phase Contrast Microscope
There are essentially two kinds of phase contrast microscopes:
- Brightfield phase contrast microscopes- In these instruments, a conventional brightfield illumination system is used wherein the sample is illuminated from above and viewed using eyepieces or a digital camera. In these microscopes, the phase contrast effect is generated by the use of a phase contrast condenser and objective lens strategically located between the light source and the sample.
- Differential interference contrast (DIC) microscopes– The DIC microscopes work on a slightly different principle to obtain the phase contrast effect. It does not have any phase contrast condenser and objective lens; instead, a special polarized light source with a pair of compensating prisms does the job for producing the effect of phase contrast. DIC microscopes are most useful while viewing transparent specimens like cells and tissues as they offer an increased degree of contrast that may not be provided by a brightfield phase contrast microscope.
Operating Procedure of Phase Contrast Microscopy
Generally, the standard protocol for phase contrast microscopy is given by the following steps:
- Sample preparation: Usually, the sample is arranged by placing it on a microscope slide and overlaying it with a thin layer of immersion oil or a coverslip. For taking full advantage of the enhancement of contrast brought about by the phase contrast illumination, the sample should be kept at its minimal thickness.
- The microscope contains a phase contrast condenser along with an objective lens, integrated with a typical phase contrast illuminating source. Both the condenser and objective lens are optimized for maximum effect in phase contrast. Then the illuminator is switched on.
- The fine focus knob is used with the light source off to adjust the microscope’s focus. This allows the operator to find the exact plane of focus for the specimen being examined.
- Illumination of the specimen: The light source is switched on, and thus the specimen will be illuminated using phase contrast illumination. The specimen is then observed either through the eyepieces or through the digital camera, as the focus is fine-tuned with the fine focus control.
- Analysis of the specimen: The operator is then able to examine the sample and gain an understanding of what it is and what it might be composed of. Photographing or filming the sample may also be useful in further analysis.
How does phase contrast microscopy help scientists to visualize difficult specimens?
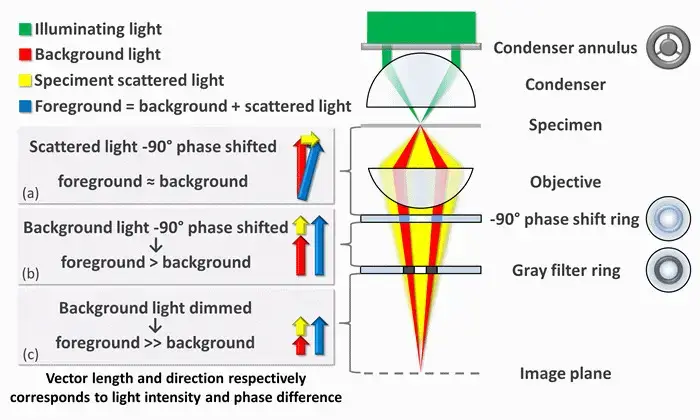
- To make phase shifts visible in phase-contrast microscopy, it is required to separate the illuminating (background) light from the specimen-scattered (foreground) light and to modify them differently.
- The ring-shaped illuminating light, which flows through the condenser annulus, is focused by the condenser onto the specimen. A portion of the illumination is scattered by the specimen (yellow). The remaining, undamaged light serves as background illumination (red). For light scattered from an unstained biological specimen, it is usually weakly phase-shifted by 90° with respect to the background light (since the typical thickness of the specimen and the refractive index mismatch between biological tissue and the surrounding medium). The intensities of the foreground (blue vector) and background (red vector) become therefore comparable, thus eliminating the picture contrast.
- There are two main mechanisms for enhancing picture contrast in a phase-contrast microscope: creating constructive interference among the dispersed light rays and background illumination within the regions of the field of view that contain the specimen, and reducing the amount of background light that reaches the image plane. The first mechanism reduces the phase discrepancy between the scattered light and background beams by advancing the background light through a 90° phase-shift ring.
- The change in phase causes constructive interference between the background and the scattered light coming from regions of the field of view that contain the sample; that is, the foreground. This causes them to be brighter than the other regions without the sample when light is focused to the image plane, where there is either a camera or an eyepiece.
- Finally, the background is attenuated by 70-90 percent using a grey filter ring; such an approach improves the amount of scattered light generated by the illumination source but lowers the amount of illumination light reaching the image plane.
- Only the phase-shift and the grey filter rings will receive some illumination from ambient light, with the dispersed light that bathes the entire surface of the filter being attenuated and phase-shifted to lesser extents.
- The phenomenon described is a negative phase contrast. When inverted, the phase shift is +90 degrees, making the background light positive. The ambient light, therefore, will be out of phase by 180 degrees compared to the scattered light. In the next image, it is seen that the scattered light minus the background light produces an image where the foreground contrast is darker and the background lighter.
Parts of Phase Contrast Microscope
- Phase Annulus in the Condenser: A black disc with a transparent ring that focuses light into a cone directed at the specimen. Meant to match the phase plates in the objectives, and comes with sizes appropriate for different objectives. Delivers partially coherent light, reduces optical noise, and aligns light with the phase plate.
- Phase Plate in the Objective: A transparent plate with a circular ring – it may be loaded with materials that advance or delay phase. Changes the amplitude of light to produce positive or negative phase contrast, making dense organelles or features easier to view. Placed over the condenser’s phase annulus so that they are conjugate.
- Phase Telescope: A type of eyepiece that transfers an image of the objective’s back focal plane to the observer’s retina. Placed to align the phase annulus with the phase ring, but sometimes an integrated Bertrand lens replaces it in microscopes.
- Green Filter: Uses green light (525 nm) to optimize phase ring material for either phase advance or retard.
While green is the traditional choice, white light can often be used successfully for phase contrast imaging. - Centering Tools: Tools to center the phase annulus in the condenser with the phase ring in the objective. Examined with a phase telescope to ensure good phase contrast imaging.
- Eyepiece: The lens or set of lenses by which the observer views the specimen.
- Head: Upper body containing the eyepiece, along with a structure that links to the objective
- Arm: Structural component to hold the head and attach to the base of the microscope.
- Base: A supporting foundation which provides the structure with stability, holding it steady.
- Nosepiece: The rotating system attached to several objective lenses for easier change of magnification
- Objective Lenses The actual primary magnifying lens located around the specimen for providing different magnification levels
- Condenser Lens Directs the light from the source to the specimen for good illumination.
- Specimen Stage This is the flat base on which the specimens are put, and usually contains clips to steady the slide on the stage
- Stage Clips Holding devices, which support the slide while viewed on the stage
- Aperture An opening in the stage that allows light passage from below to enlighten the specimen.
Applications of Phase contrast Microscopy
- Cell Morphology-Phase contrast microscopy allows observing the fine detail and shape of living cells without using stains; thus, the views of cell organelles and membranes become quite different.
- Live Cell Imaging– Live cell imaging allows the observation of living cells in their natural state, including monitoring cellular movement, division, and other dynamic processes.
- Microbial Studies– It is used for the study of microbes such as bacteria and protozoa in their natural habitat and to enhance the contrast of transparent specimens without using dyes.
- Tissue Analysis- useful for examination of thin tissue sections to bring out fine details and differentiation in medical and biological studies.
- Neuroscience Research–Neuroscience research is used to view neurons in relation to their connections. This allows observing how brain cells and neural activity work.
- Protein Localization– It helps in studying protein distribution inside cells and coupled with fluorescent markers, in understanding various cellular functions and pathology.
Advantages of Phase contrast Microscopy
- Increased Contrast: Phase contrast microscopy is the technique through which the transparent and colorless specimens are viewed without staining.
- Non-destructive Observation: The methodology allows us to observe living cells as they are, without needing fixation or staining.
- Monitoring Real-time Process: Phase contrast microscopy permits us to study biological processes within the cell and tissues as it happens.
- Cost-effective: Phase contrast microscopy does not need expensive dyes or stains, thus saving money for laboratory use.
Limitations of Phase contrast Microscopy
The primary limitations are as follows:
- Halo Formation- The most serious problem is the appearance of halos around regions of high phase shift. Optical artifacts of this type mask the definition of details, which means that the fine structures of the specimen cannot be seen. Halos may be bright edges in positive phase contrast or dark edges in negative phase contrast and are difficult to interpret.
- Reduced Resolution- The introduction of phase annuli in the optical system imposes a restriction on the numerical aperture, which in turn reduces the resolution of the images. This may be a particularly difficult constraint when high resolution is critical for the imaging experiment.
- Distortion in Thick Specimens- Phase contrast microscopy is not as effective on thick specimens. The phase shifts that are induced from regions positioned above or below the focal plane can cause out-of-focus blur, thus causing distortion of the image and obscuring important details. This, therefore, makes obtaining clear images from thicker samples rather difficult.
- Optical Phase Artifacts– Other optical artifacts could be expected besides halos, such as shade-off and contrast inversion. Shade-off refers to intensity gradients within large phase objects and therefore may give false interpretations in brightness and structure. Contrast inversion arises when a refractive-index high object’s brightness is larger than that predicted; hence the image interpretation becomes much more complicated.
- Alignment and Light Intensity Requirements- Alignment of the light path is important in order for a successful phase contrast imaging. Also, this technique would usually need greater light than in bright-field microscopy because it employs dimming, not brightening.
- Cost and Complexity- The addition of highly specialized components, including objective lenses and condensers employing phase contrast adds to the microscope’s expense and complexity. Its use in simple laboratories and, therefore in the schools is yet to be taken up.
- https://ibidi.com/content/213-phase-contrast
- https://www.microscopemaster.com/phase-contrast-microscope.html
- https://www.biologydiscussion.com/botany/practicals-botany/parts-and-working-of-phase-contrast-microscope-botany/54531
- https://www.microscopyu.com/techniques/phase-contrast/introduction-to-phase-contrast-microscopy
- https://en.wikipedia.org/wiki/Phase-contrast_microscopy
- https://www.slideshare.net/manjunathasanka/phase-contrast-microscope-41441936
- https://www.ruf.rice.edu/~bioslabs/methods/microscopy/phase.html