What is Polarizing Microscope?
Polarizing microscopes, also called petrographic microscopes, are specialized optical instruments designed for the examination of specimens that display birefringence—materials that divide light into two rays that propagate at different velocities. This unique property allows scientists to study the optical properties of anisotropic substances, which have properties that depend on direction. But what is the mechanism of operation of these microscopes, and what explains their great utility in fields such as geology and biology?5
This manipulation of light, which is essentially the core aspect of a polarizing microscope, will ensure that the microscope transmits only waves that oscillate in one plane alone. This results in the specimen being illuminated with polarized light. When the polarized light meets a birefringent sample, it splits into two rays; these rays are vibrating perpendicular to each other, yet they both move at different velocities. When these rays are recombined through an analyzer, which is a second polarizing filter oriented perpendicular to the first, their interference results in the production of contrast and variations in color. This interaction exposes intricate details regarding the specimen’s structure and composition that would otherwise remain concealed under standard illumination. Consider the challenge of identifying minerals within a rock sample.1
Utilizing a polarizing microscope, geologists are able to differentiate minerals by means of their distinct optical properties, including refractive indices and birefringence patterns. This technique is known as optical mineralogy, and it is the basis of petrology in the classification and history explanation of rocks.5
These microscopes are irreplaceable in biology for visualizing structures such as cellulose within plant cell walls or detecting crystalline formations within tissues. This ability gives greater scope for our understanding of biological processes and material characteristics. Operating a polarizing microscope needs a sharp eye and knowledge of the principles of polarized light. The user may rotate the stage and adjust the polarizers so that changes in color and intensity are observed to give clues regarding the anisotropic nature of the specimen. It is rather like solving a puzzle, as each adjustment sharpens the image and reveals more of the secrets of the material.7
It is transformative for college students and teachers venturing into the fields of geology, biology, or materials science to become proficient in using a polarizing microscope. It opens up the microscopic world of anisotropic materials to reveal interesting and crucial information that science requires. So, when you next handle a polarizing microscope, remember that it is not just an instrument; it is a key to unlock the hidden stories of the microscopic world.23
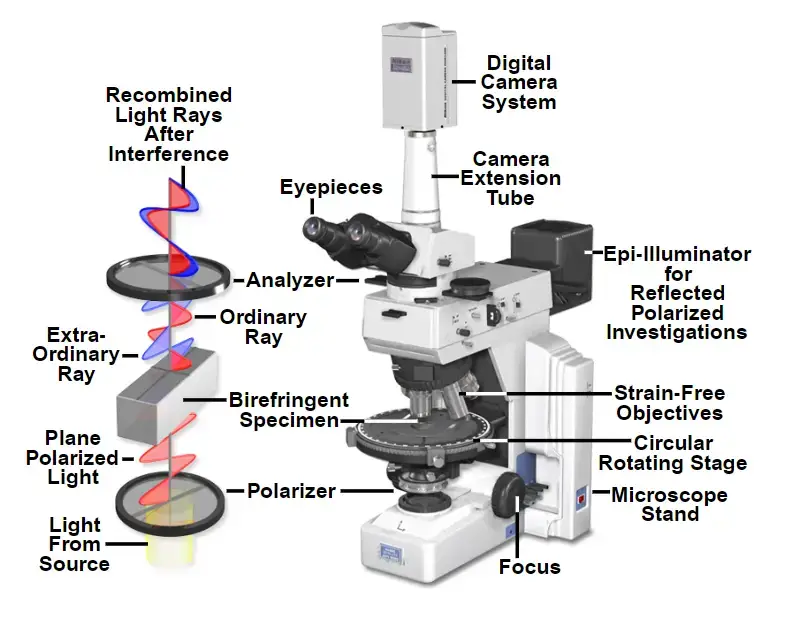
Principles of Polarized Light Microscope
In a polarized light microscope, the source of light and sample are separated by a polarizer. The polarized light source is converted into plane-polarized light before it reaches the sample. The polarized light is passed through a material that demonstrates double refraction. This creates two wave components oriented perpendicular to each other. These two waves are known as common and exceptional light beams.
The waves pass through the specimen in several phases. An analyzer then superimposes these phases by constructive and destructive interference. This leads to the formation of an image with high contrast.
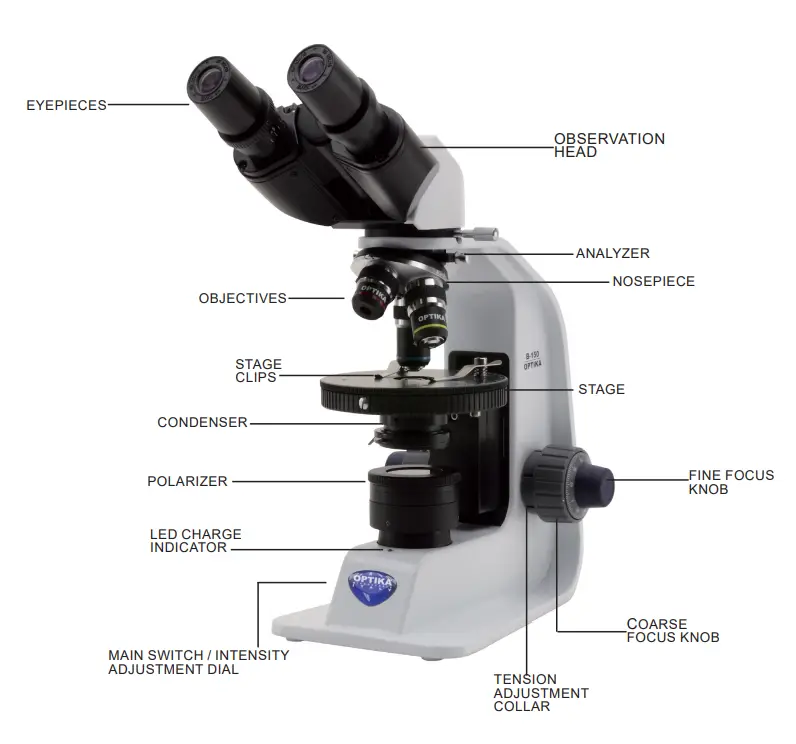
Parts of a Polarized Light Microscope
Major components of a PLM are
- Polarizer. Mounted at the bottom of the specimen stage, a polarizer filters incoming illumination to produce plane polarized illumination. In most cases, its vibration direction is fixed horizontally (East West); however some models allow rotation through 360°.
- Analyzer: It is placed above the objective lenses and below the eyepiece. The analyzer is a second polarizing filter that is positioned perpendicular to the polarizer. In this crossed position, only the light altered by the specimen is allowed to pass through to the observer, enhancing contrast and birefringent properties.
- Strain-Free Objectives and Condenser: These are optical elements that eliminate internal stresses, which can introduce unwanted birefringence, thus permitting detailed observations of the optical properties of the specimen.
- Rotatable circular stage: The stage allows for 360-degree rotation hence enabling the examination of any specimen from different angles under polarized light. Graduated markings allow for the exact measurement of rotational angles that help in the optical properties analysis.
- Compensators and Retardation Plates – Compensators and retardation plates are used to manipulate light in the optical path. Inserts, such as full-wave retardation plates, quartz wedges, or quarter-wave plates, can be placed in the light path. These instruments change the phase of light passing through the specimen, increasing contrast and allowing for the determination of optical properties such as birefringence and optical sign.
- Bertrand Lens: Also called a phase telescope, it is used to observe interference patterns (conoscopic images) formed by birefringent specimens. It is used in the study of optical indicatrices and optic sign determination.
- Coarse and Fine Focus Knobs: These are controls that vary the height of the stage so that the specimen is brought into focus. The coarse focus is used for rapid changes while the fine focus is used for precise control which is important in detailed examination.6
- Illumination System: A light source, often with a condenser, will provide even illumination. In polarized light microscopy, the illumination system may be fitted with filters to control intensity and wavelength, enhancing image quality.
- Eyepieces (Oculars): The eyepieces are used to magnify the image produced by the objective lenses. Some polarized light microscopes have a pointer or reticle to enable measurement.
Operating Procedure of Polarized Light Microscope
Using a Polarized Light Microscope (PLM) requires care and attention in order to produce accurate and reliable observations. This is a simplified guide to aid you:
- Turning the Microscope On
- Switch on the light: Locate the power switch, commonly found on the side or bottom of the microscope, and turn it on.
- Preparation of the Specimen
- Place the specimen slide on the stage: Carefully place your prepared slide on the microscope stage, making sure it is firmly clamped in place.
- Illumination
- Adjust the light intensity to a comfortable viewing level: Use the control lever or dial to adjust the light intensity to a comfortable viewing level.
- Open the field diaphragm: Ensure the field diaphragm is open to the edge of the field view to provide uniform illumination.
- Focusing the Image
- Focus using coarse and fine adjustments: Use the coarse focus knob to see a general overview of the specimen, and the fine focus knob for small and precise changes. Move the slide to view the entire specimen: Gently move the slide and look at parts of the specimen, focusing where necessary.
- Polarization Filters
- Insert polarizer: Place the polarizer filter in the optical path, usually below the stage, to polarize the light.
- Set analyzer: Insert the analyzer filter into the optical path, usually above the objective lens, to look at the polarized light that passes through the specimen.
- Rotate analyzer: Rotate the analyzer to observe the specimen through crossed polarizers, which enhances contrast and reveals birefringent materials.
- Changing Objectives
- Change objectives if needed: Rotate the nosepiece to bring the desired objective lens into position.
- Refocus and diaphragms: Refocus using the fine adjustment knob and then adjust the field and aperture diaphragms to get maximum contrast and resolution.
- Final Adjustments
- Align properly: Ensure that all optical parts, including polarizer and analyzer, are properly aligned for observations.
- Record observations: Note your observations with any detail relevant to the specimen’s appearance under polarized light.
Applications of Polarized Light Microscope
Polarized Light Microscopy (PLM) is a useful method used in many scientific fields to study materials that have different optical properties. It can be used in:
- Mineralogy and Geology: PLM is often used to find and describe minerals in rock samples. By looking at the birefringent properties of minerals, geologists can find out their composition and structure.
- It is applied in forensic investigations, where PLM studies small evidence like fibers, hair, and glass fragments to help match materials found at the crime scene to potential sources.
Biology and Medicine: Biological tissues and structures are studied through PLM. This includes studying collagen fibers and muscle tissues to understand how fibers are organized and positioned within tissues. - Material Science: It can be used for determining the areas of stress within materials such as metal and glass. From birefringence patterns, one can trace mechanical stresses or strains at particular points.
- Semiconductor Industry: PLM detects defects within semiconductor materials. It allows one to inspect semiconductor wafers for stress and strain, a very important quality control tool during manufacturing.
- Environmental Science: PLM helps examine soil samples and identify mineral presence and composition. This helps scientists understand the constituents of the soil and what its structure is compatible with for multiple agricultural uses.
Advantages of Polarized Light Microscope
The advantages of material analysis through Polarized Light Microscopy are as follows:
- Non-Invasive Analysis: PLM allows one to view the sample without using chemical staining or other preparation methods that can harm the integrity of the specimen.
- Improved Contrast: The polarized light greatly improves contrast compared to the unaided human eye, thereby helping distinguish one material from another as well as from the various structures in the sample.
- It identifies crystal structures very well since it is able to recognize birefringence. This is the property that is present in a crystal under polarized light.
- Rapid Analysis: The technique is fast and also convenient. Hence, it is capable of identifying the salts and the other crystalline products in different samples.
- Portable Equipment: Basic polarizing microscopes are portable in nature. Such microscopes allow on-site analysis of sensitive materials at different places.
Limitations of Polarized Light Microscope
- Limited Quantitative Analysis: Standard PLM primarily addresses descriptions, so it is impossible to obtain an exact measurement of birefringent properties. This is because the brightness of light observed varies with the angle of the optic axis of the material to the polarization filters. In biological samples, for example, histological sections, birefringent materials can be oriented at different angles in the sample, making it difficult to quantitatively analyze the sample.
- Complex Sample Preparation: Certain samples, particularly biological tissues, demand specific preparation methods to enhance birefringence. This would make the analysis more complicated and time-consuming. For example, histological sections could be prepared with birefringent angle-containing materials, making imaging challenging and hard to understand.
- Special Training Required: The proper use of PLM requires special training in the interpretation of birefringent patterns. This may make it difficult for beginners to learn the technique. The technique is popular among geologists, mineralogists, and chemists, but it takes a lot of training to use it right. This makes it more difficult to enter the field and training takes longer.
- Only for Birefringent Materials: PLM is practicable for birefringent materials. Isotropic materials, which are not birefringent, do not find any purpose in the case of polarized light. Briefly, the identification of salts by a polarized light microscope along with advantages and disadvantages of the method are explained.
- https://microscopeinternational.com/optika-b-150p-brpl-binocular-led-polarizing-microscope-rechargeable/
- https://www.microscope.healthcare.nikon.com/products/polarizing-microscopes
- https://www.microscopyu.com/techniques/polarized-light/polarized-light-microscopy
- https://www.olympus-lifescience.com/en/microscope-resource/primer/techniques/polarized/configuration/
- https://www.azolifesciences.com/article/What-are-Polarized-Light-Microscopes-and-How-Do-They-Work.aspx
- https://www.microscopeworld.com/t-polarizing_microscopes.aspxhttps://www.microscope.com/specialty-microscopes/polarizing-microscopes
- https://www.sciencedirect.com/topics/chemistry/polarizing-microscopy
- https://meijitechno.com/meiji_old/polarizing_applications.htm
- https://www.news-medical.net/Life-Science-and-Laboratory/Polarizing-Microscopes
- https://zeiss-campus.magnet.fsu.edu/referencelibrary/polarizedlight.html
- https://www2.humboldt.edu/scimus/HSC.36-53/Descriptions/AOPolScp.htm
- https://www.optikamicroscopes.com/optikamicroscopes/product/pol-series/
- https://www.motic.com/As_Polarized_microscope/
- https://amscope.com/collections/polarizing-microscopes
8 replies on “Polarizing Microscopes – Principle, Definition, Parts, Applications”
> it is a key to unlock the hidden stories of the microscopic world.
ghfghghf
> PLM allows one to view the sample without using chemical staining or other preparation methods that can harm the integrity of the specimen.
gfh gfh
> geologists can find out their composition and structure.
gfhgfh gfh ff g f
> This interaction exposes intricate details regarding the specimenu2019s structure and composition that would otherwise remain concealed under standard illumination. Consider the challenge of identifying minerals within a rock sample.
cvcxvcxvx
> The polarized light greatly improves contrast compared to the unaided human eye, thereby helping distinguish one material from another as well as from the various structures in the sample.
hj gj g
> Certain samples, particularly biological tissues, demand specific preparation methods to enhance birefringence.
hgj gj gj gj
> Standard PLM primarily addresses descriptions, so it is impossible to obtain an exact measurement of birefringent properties. This is because the brightness of light observed varies with the angle of the optic axis of the material to the polarization filters. In biological samples, for example, histological sections, birefringent materials can be oriented at different angles in the sample, making it difficult to quantitatively analyze the sample.
gh gh
> Polarizing microscopes, also called petrographic microscopes, are specialized optical instruments designed for the examination of specimens that display birefringence-materials that divide light into two rays that propagate at different velocities. This unique property allows scientists to study the optical properties of anisotropic substances, which have properties that depend on direction. But what is the mechanism of operation of these microscopes, and what explains their great utility in fields such as geology and biology?
bvnv